Ironclad is the safest starting character in Slay the Spire 2. With 80 HP and Burning Blood healing after every fight, he forgives Act 1 mistakes better than any class. His toolkit rewards committing to one scaling axis — Strength, Exhaust, or Block — and his weakness is card draw.
Ironclad returns as the safest starting character with 80 HP and Burning Blood healing after every combat.
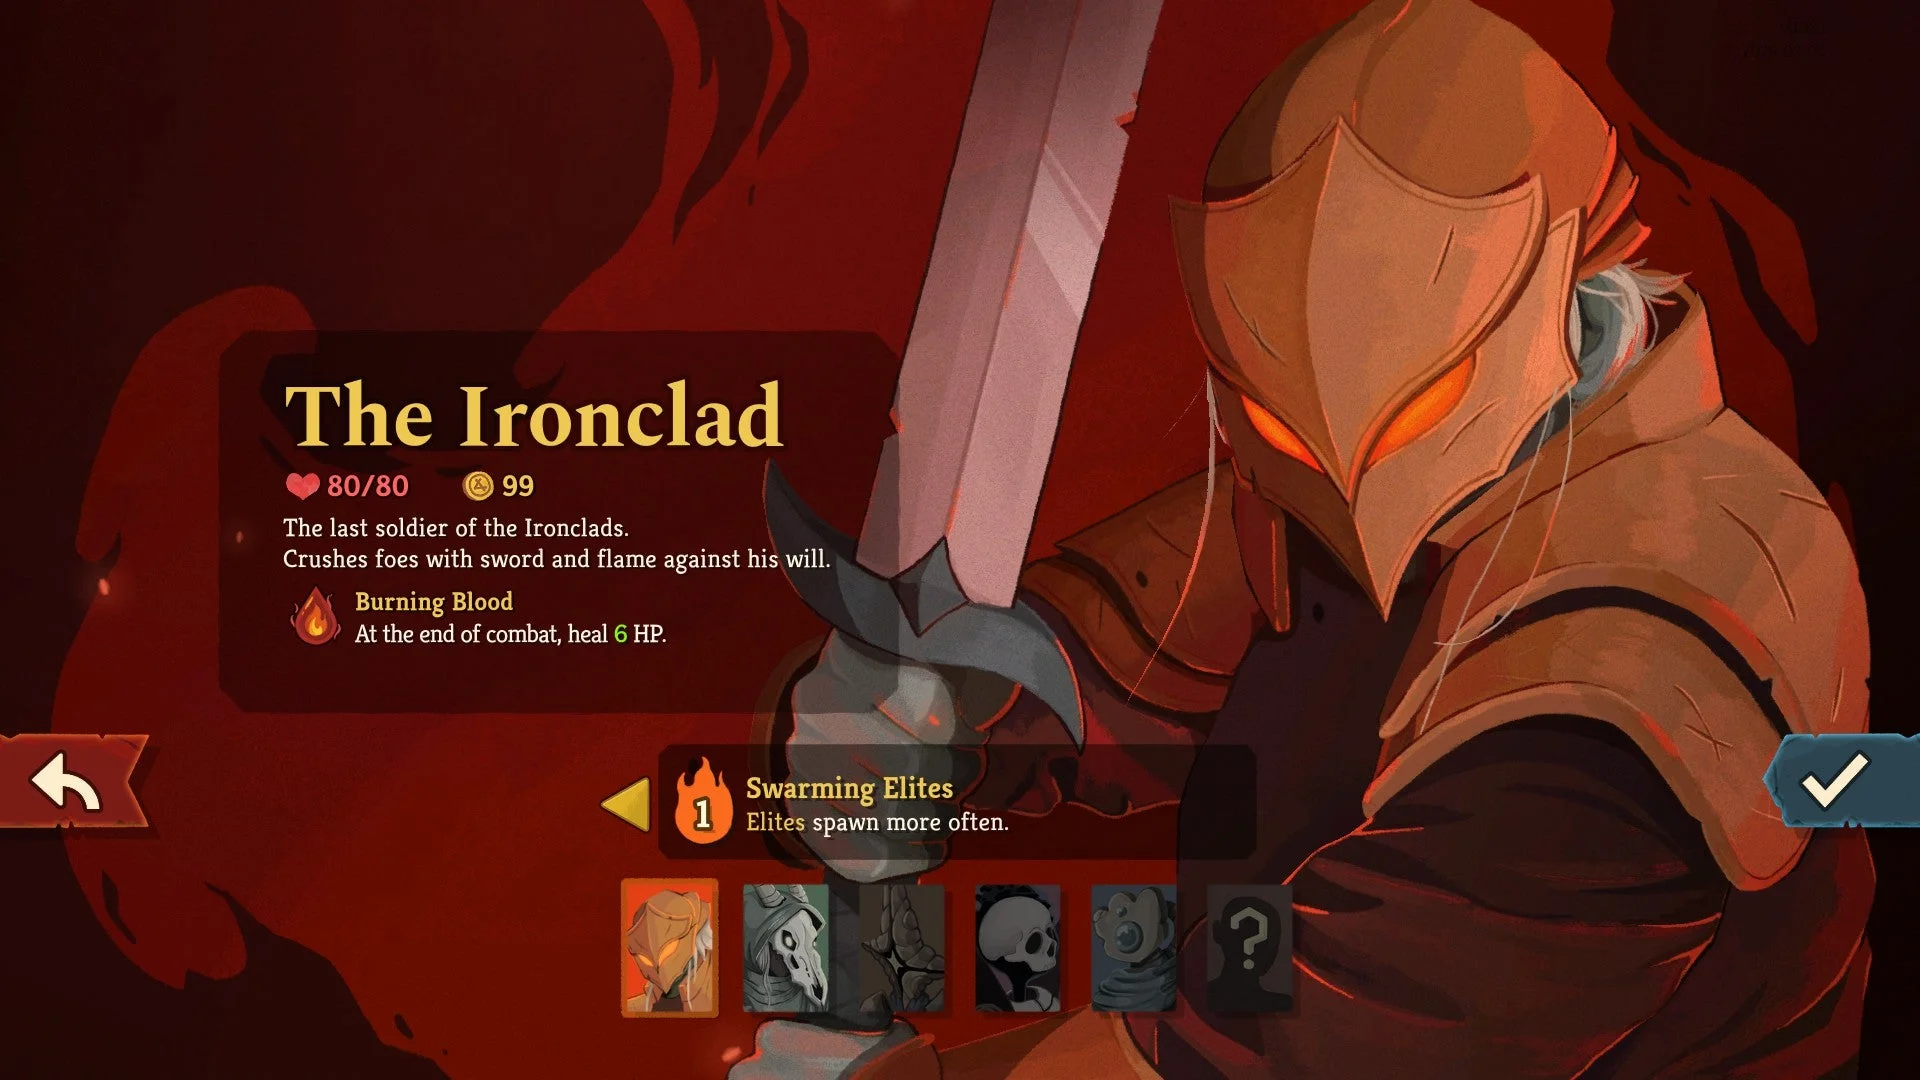
Ironclad is the recommended first character for anyone new to Slay the Spire 2. The 80 HP pool is the largest in the roster, and Burning Blood heals 6 HP after every combat — a cushion that lets you take a few extra hits while learning the sequel's new systems like Enchantments, Quest Cards, and Alternate Acts. No other character gives you that margin.
Returning STS1 players will find the familiar Strength-and-Exhaust shell, but the details have shifted. Dead Branch is removed, Shockwave is now a neutral card any character can take, and several new cards (Brand, Pact's End, Ashen Strike, Crimson Mantle) create a Self-Damage archetype that did not exist in the original. The class still rewards commitment — pick one scaling direction by mid-Act 1 and build around it.
Verification note
Cross-verified against Mobalytics, GameRant, GAMES.GG, Untapped.gg card data, and Chinese/Japanese community guides. 87 cards confirmed via Untapped.gg.
What to focus on with Ironclad
This guide is built to answer three things fast: what is confirmed about Ironclad, what makes the class feel different, and what matters in the first few runs.
Think of it as a first-pass class read before you move into build ideas, mechanic explainers, or deeper matchup talk.
Start here before you jump into build speculation or tier lists.
Open the linked mechanics pages if Ironclad depends on a signature keyword or resource system.
Treat this as an early access primer, not a final meta verdict.
Ironclad revolves around three interconnected systems: Strength, Exhaust, and Block. Strength increases all Attack damage by a flat amount per stack, and Ironclad has more reliable Strength generators than any other character once , , and start compounding. Exhaust removes cards from your deck for the rest of combat, which sounds like a cost but is actually a resource: multiple cards trigger effects every time something is Exhausted. Block prevents damage on a one-to-one basis and normally decays at end of turn, unless Barricade is active.
The interaction between these systems creates Ironclad's decision space. Exhaust thins the deck, which means your Strength payoff cards appear more often. Block cards bought time for Strength Powers to come online. Self-damage cards feed Rupture for faster Strength while spending HP that Burning Blood replenishes between fights. Every card you add or remove shifts the balance between these three axes.
Ironclad's weakness is draw. He has the fewest zero-cost draw engines of any character. Offering (0 cost: lose 6 HP, gain 2 energy, draw 3-5 cards) is the main solution, and community data shows it is taken in over 70 percent of winning Ironclad runs. If you are not finding draw, keep the deck small — 15 to 20 cards — so you see your key cards every other turn naturally.
Burning Blood heals 6 HP after every combat. This does not sound like much, but across a 15-fight Act 1 that is up to 90 HP recovered — more than Ironclad's entire starting pool. The implication is that taking slightly more damage per fight is acceptable if it means winning faster and spending less time in vulnerable states. Ironclad is the only character where trading HP for tempo in Act 1 is consistently correct.
First three card rewards: prioritize one Attack upgrade and one Block card. Ironclad's starter deck has poor damage output, so upgrading Bash or adding a midrange Attack (Carnage, Pommel Strike, Iron Wave) prevents hallway fights from dragging. Block cards matter because Act 1 elites hit hard — 20+ damage on turn 2 is common — and Ironclad's starting Block cards are mediocre.
First campfire: almost always upgrade. Ironclad's Burning Blood means resting is rarely needed in Act 1 unless you are below 30 HP going into an elite. Upgrading Bash (adds 1 Vulnerable stack) or your first good Attack card accelerates the entire Act.
Ironclad starts with 3 energy and draws 5 cards per turn. That means playing roughly 2-3 cards per turn in early fights — one Attack and one Block card, with occasional room for a Power or utility card. The class does not naturally accelerate energy production (unlike Regent's Star-to-energy conversion or Silent's 0-cost Sly chains), so your energy count only increases through relic drops or Offering.
Turn sequencing is simpler than Silent or Necrobinder. Most Ironclad turns follow a predictable pattern: play Powers first (they persist), then Block to survive the incoming attack, then Attacks with remaining energy. The exception is Exhaust turns, where playing Skills before Attacks matters because Dark Embrace draw triggers can give you more cards to play. Learning to sequence Exhaust correctly is what separates a mid-tier Ironclad from a high-tier one.
Key energy spike: Offering (0 cost: lose 6 HP, gain 2 energy, draw 3-5 cards) transforms a 3-energy turn into a 5-energy turn while drawing your deck. It is the single best turn-acceleration card in Ironclad's pool and the main reason the class can compete at high Ascension despite having no natural draw engine.
Ironclad is strong against single-target bosses that give him time to set up Strength. Ceremonial Beast and Doormaker both have patterns where they do not attack every turn — these are Ironclad's best matchups because they let Demon Form or Barricade come online safely. Vantom's multi-hit pattern is slightly dangerous but manageable with Block cards.
Ironclad struggles against Insatiable (Act 2) because the Sandpit mechanic imposes a hard turn timer. Slow Barricade or Demon Form setups can lose to the instant-death threshold if damage output is too low. Against Insatiable, Ironclad needs early aggression — Strength builds that scale fast through and outperform late-game-only Power setups.
The Queen (Act 3) binds 3 cards per turn, leaving you with only 2 playable cards. Ironclad handles this better than most characters because his best cards (, ) are individually powerful — a single Body Slam at 150 Block deals lethal damage. Classes that rely on card chains (Silent, Regent) suffer more from The Queen's bind.
Kaiser Crab (Act 2) alternates between heavy single hits and Block phases. Ironclad's Strength scaling handles the Block phases better than most classes because big payoffs like or a high-Strength still convert setup into real damage. Doom-based or Poison-based characters struggle with Kaiser Crab's Block more than Ironclad does.
In co-op, Ironclad fills the tank role. His 80 HP and Burning Blood let him absorb hits that would cripple Silent (70 HP) or Regent (68 HP). The best two-player combination is Ironclad plus Silent — Ironclad tanks and applies Vulnerable while Silent deals massive damage through Sly or Poison. Beacon of Hope (a co-op relic) lets Block be shared across teammates, which makes Ironclad's Barricade build especially valuable in multiplayer.
In three or four-player games, Ironclad should focus on Vulnerability application (Bash, Uppercut) and area damage (Whirlwind, Cleave, Pact's End) rather than pure single-target Strength. Co-op encounters scale enemy HP, so multiplier effects and debuffs become more valuable than raw damage numbers.
Ironclad pairs poorly with Necrobinder in co-op because both characters want to be in the front-line damage role and neither provides meaningful support. If you want a tanky duo, Ironclad plus Regent is better — Regent's Stars provide utility while Ironclad handles the damage floor.
Ironclad has four main archetypes. Strength Scaling (S tier) uses plus current support like and for compounding damage — the most consistent build and the best for beginners. Exhaust Engine (S- tier) runs , , and to turn card removal into draw and Block — the highest ceiling since Dead Branch was removed. Block/Barricade (A+ tier) stacks persistent Block and converts it to damage with — the safest boss-killing approach. Self-Damage/Rupture (A tier) is new in STS2, using HP loss to trigger Strength gains and AoE through — fast scaling but risky above Ascension 10.
For detailed card lists, relic synergies, and combo math for each archetype, see the Ironclad Builds page.
Adding too many cards. Ironclad's lack of draw means a 30-card deck cycles slowly and dilutes key cards. Aim for 15-20 cards by Act 2. Remove Strikes aggressively at shops — every Strike removed is one fewer dead draw per cycle.
Ignoring Exhaust because it sounds bad. New players see 'Exhaust: remove this card for the rest of combat' and avoid it. But Exhausting bad cards (Strikes, Defends, Status cards) makes your deck smaller mid-combat, which means you draw your good cards more often. Dark Embrace and Feel No Pain convert Exhaust into draw and Block, turning a perceived downside into Ironclad's strongest engine.
Playing Demon Form on turn 1 against elites. Demon Form costs 3 energy and does nothing on the turn it is played, leaving you with 0 energy for Block. Against Act 1 elites that deal 20+ damage on turn 2, this is frequently lethal. Play defensive cards turns 1-2, then Demon Form on turn 3 when the elite's attack pattern gives a gap.
Skipping Offering. Losing 6 HP for 2 energy and 3-5 draw is almost always worth it because Burning Blood heals 6 HP after combat anyway. Offering is Ironclad's best answer to his draw weakness and appears in the majority of high-Ascension winning decks.
The biggest design shift is Dead Branch's removal. In STS1, Dead Branch plus Corruption created an infinite random-card engine that could solo any encounter. STS2 replaced this with intentional finishers: Pact's End (0 cost: 17 AoE damage, Exhaust) and Ashen Strike (damage scales with total Exhausts). The result is that Exhaust builds are still very strong but require deliberate deck construction instead of one relic solving everything.
Shockwave moved to the neutral card pool — all characters can now access AoE Weak plus Vulnerable. This reduces Ironclad's monopoly on debuff application and makes co-op less dependent on having an Ironclad teammate. Current Strength payoffs lean more on , , and than on older STS1 one-card doublers, and small-deck vulnerable loops are less stable than older writeups suggest.
New additions: Brand (0 cost: lose 1 HP, Exhaust a card, gain 1 Strength) bridges all three of Ironclad's systems in a single card. Crimson Mantle and Inferno create the Self-Damage/Rupture archetype that did not exist in STS1. Hellraiser (Power: drawn Strike cards auto-play) enables a Strike-density deck that was never viable before.
Comparison
What changed from Slay the Spire 1
Ironclad is still the safest mental bridge into the sequel, but the biggest shift is not a flashy class keyword. It is that his familiar shell now teaches a different game structure.
Reasonable launch-build readCharacter
What stayed familiar
Slay the Spire 1
Ironclad was the cleanest first class for learning tempo, damage, and block without too many extra moving parts.
Slay the Spire 2
Ironclad still looks like the best class for learning the sequel's basics before you pile on a new class engine.
Why it matters
If you want the easiest transition from the first game, he is still the most stable place to begin.
A familiar Ironclad run mostly taught you the first game's original act and reward flow.
Slay the Spire 2
A familiar Ironclad run now teaches Quest Cards, Ancients, Alternate Acts, and other sequel systems even before the class gets a dedicated reveal post.
Why it matters
The class feels familiar, but the lessons it teaches are different because the sequel's structure is different.
Ironclad. His 80 HP and Burning Blood let you survive mistakes while learning Enchantments, Quest Cards, and Alternate Acts. Silent rewards precise hand sequencing that is hard to learn when you are also learning the sequel's systems.
How does Burning Blood compare to other starting relics?
Burning Blood heals 6 HP after every combat. Over a full act (roughly 15 fights), that is up to 90 HP recovered — more than the entire starting pool. No other starting relic provides comparable sustain. Ring of the Snake (Silent) gives draw, Cracked Core (Defect) gives a Lightning Orb, Crown Jewels (Regent) gives Stars.
What is Ironclad's biggest weakness?
Card draw. Ironclad has the fewest draw tools of any character. Offering (0 cost: lose 6 HP, draw 3-5) is the main fix. Keep decks small (15-20 cards) to compensate.
Is Ironclad good in co-op?
Yes, especially as the team's tank. His high HP, Vulnerability application, and AoE damage (Whirlwind, Pact's End) make him the best frontliner. Pair with Silent or Regent for maximum team synergy.